Quickstart
Get EidKit running in a mobile app in minutes.
Requirements
- Android (Kotlin)
- iOS (Swift)
- Android API 26+ (Android 8.0)
- A device with NFC
- A Romanian CEI card for testing
- iOS 15+
- iPhone 7 or later (NFC required)
- A Romanian CEI card for testing
1. Install
- Android (Kotlin)
- iOS (Swift)
// app/build.gradle.kts
dependencies {
    implementation("ro.eidkit:sdk-android:0.1.7")
}
// Package.swift
dependencies: [
    .package(url: "https://github.com/eidkit/eidkit-ios-releases", from: "0.1.9"),
],
targets: [
    .target(name: "MyApp", dependencies: ["EidKit"]),
]
2. NFC setup
- Android (Kotlin)
- iOS (Swift)
Add the NFC permission, intent filter, and tech filter to AndroidManifest.xml:
<!-- AndroidManifest.xml -->
<uses-permission android:name="android.permission.NFC" />

<application ...>
    <activity
        android:name=".MainActivity"
        android:launchMode="singleTop">  <!-- required for onNewIntent -->

        <intent-filter>
            <action android:name="android.nfc.action.TECH_DISCOVERED" />
        </intent-filter>
        <meta-data
            android:name="android.nfc.action.TECH_DISCOVERED"
            android:resource="@xml/nfc_tech_filter" />
    </activity>
</application>
Create res/xml/nfc_tech_filter.xml:
<?xml version="1.0" encoding="utf-8"?>
<resources>
    <tech-list>
        <tech>android.nfc.tech.IsoDep</tech>
    </tech-list>
</resources>
Attach NfcManager to your Activity to receive card tap events:
class MainActivity : ComponentActivity() {
    private val nfcManager = EidKit.nfcManager()

    override fun onResume() {
        super.onResume()
        nfcManager.enableForegroundDispatch(this)
    }

    override fun onPause() {
        super.onPause()
        nfcManager.disableForegroundDispatch(this)
    }
}
Add the Near Field Communication Tag Reading capability in Xcode (Target → Signing & Capabilities) and make sure both TAG and PACE formats are enabled.
Add to YourApp.entitlements:
<key>com.apple.developer.nfc.readersession.formats</key>
<array>
    <string>TAG</string>
    <string>PACE</string>
</array>
Add to Info.plist the usage description and the CEI AID identifiers:
<key>NFCReaderUsageDescription</key>
<string>EidKit reads your identity card via NFC.</string>

<key>com.apple.developer.nfc.readersession.iso7816.select-identifiers</key>
<array>
    <string>A0000002471001</string>
</array>
The SDK presents the system NFC sheet automatically at each session — no additional UI setup needed.
3. Configure the SDK
- Android (Kotlin)
- iOS (Swift)
Create an Application class and register it in the manifest:
class MyApp : Application() {
    override fun onCreate() {
        super.onCreate()
        EidKit.configure(this, EidKitConfig {})
    }
}
<!-- AndroidManifest.xml -->
<application android:name=".MyApp" ...>
Call EidKitSdk.configure() once at app startup:
@main
struct MyApp: App {
    init() {
        try? EidKitSdk.configure()
    }
    var body: some Scene {
        WindowGroup { ContentView() }
    }
}
The SDK runs in demo mode by default — data read from the card is automatically masked. Ideal for development and testing without exposing real personal data. A licenseToken is reserved for future licensing enforcement — you can configure it early and your integration will not need to change.
4. Read a card
- Android (Kotlin)
- iOS (Swift)
onNewIntent is called when an NFC card is detected. Requires android:launchMode="singleTop" on the Activity (configured in step 2).
override fun onNewIntent(intent: Intent) {
    super.onNewIntent(intent)
    val isoDep = nfcManager.handleIntent(intent) ?: return

    lifecycleScope.launch {
        val result = EidKit.reader(can = userEnteredCan)
            .withPersonalData(pin = userEnteredPin)
            .withActiveAuth()
            .read(isoDep)

        // result.passiveAuth  — always present
        // result.identity     — name, CNP, DOB
        // result.personalData — address, document info
        // result.claim        — proof material for backend verification
    }
}
import EidKit

func readCard() async throws {
    let result = try await EidKitSdk.reader(can: userEnteredCan)
        .withPersonalData(pin: userEnteredPin)
        .withActiveAuth()
        .read()

    // result.passiveAuth  — always present
    // result.identity     — name, CNP, DOB
    // result.personalData — address, document info
    // result.claim        — proof material for backend verification
}
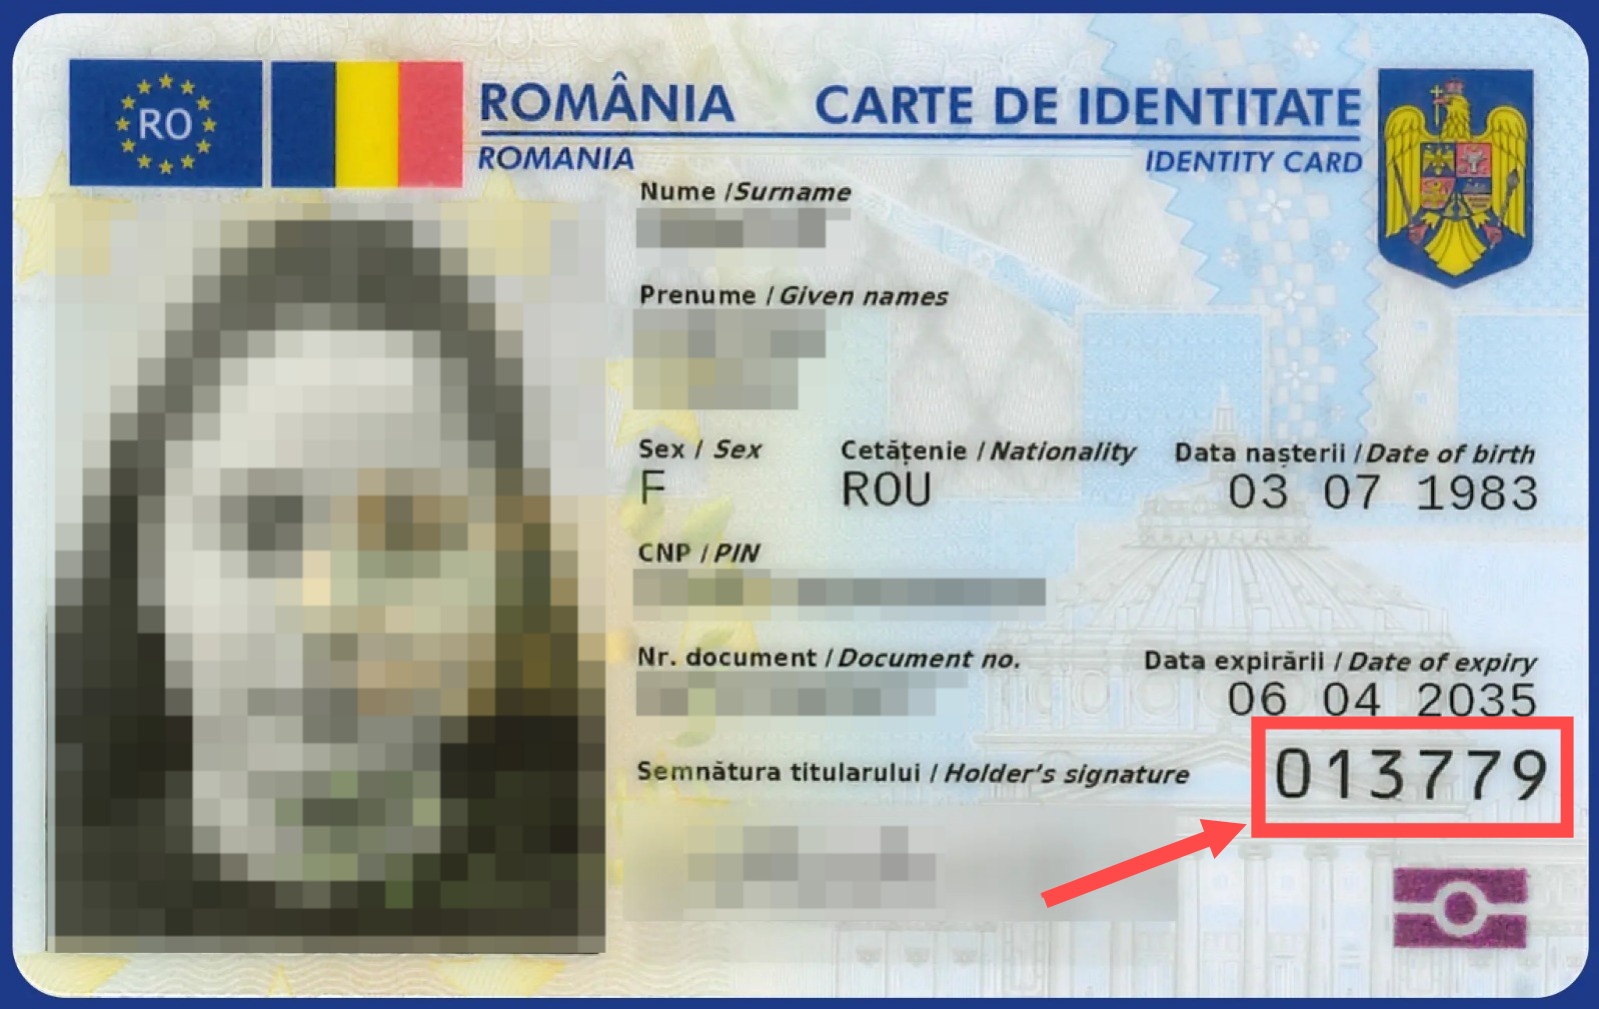
The CAN is the 6-digit number printed on the front of the card. The user must enter it in your app UI — never hardcode or store it.
The Romanian CEI allows only 3 incorrect PIN attempts before the PIN is blocked. A blocked PIN requires an in-person visit to an MAI service point to unblock. Always let the user enter their PIN themselves.
Next steps
- KYC — read identity data and photos
- Document Signing — sign PDFs with the card
- Active Authentication — verify chip authenticity
- Chip Authentication — bind identity to the physical chip (required for production)
- Android API Reference ↗
- iOS API Reference ↗